A Student's Guide to Gemini Notebook
This blog post is designed for students and teachers who are looking to enhance learning and education using the AI-assisted features on Google's Gemini Notebook. This tool has the ability to create quizzes, flashcards, audio/video overviews, and study guides with the click of a button. It's like Quizlet and ChatGPT all in one, and the best part is... its free!
For a very quick recap of the information in this post, you can check out the video below:
Now... let's dive into the Google Gemini Notebook!
Adding Sources
Once you create your first notebook, you will be met by this pop-up:

Gemini uses the files or sources uploaded here as the information needed to generate all of your study materials. In the "or drop your files" box, you can upload your own notes to create study guides from, or you can use the search bar which Gemini will use to compile its own sources. For students, I would highly recommend uploading your own files. As any other AI tool, Gemini combs the internet for information, often pulling from unreliable sources, so uploading information straight from your teachers and professors eliminates that possibility.

Make sure that "Select All" or at least one source is clicked. Otherwise, Gemini will have no information to create material from
Creating a Study Guide
Step 1: On the right side of the notebook dashboard, you will see a section labeled "Studio." This section contains all of your tools for generating material:
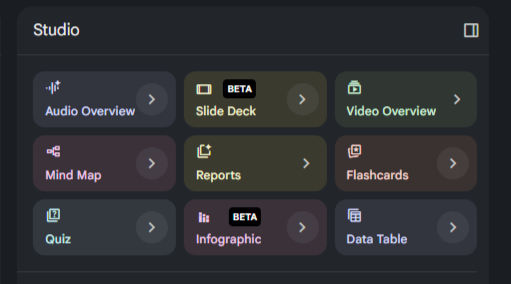
Step 2: To create a study guide, you will want to click on the little arrow held within the "Reports" button. After clicking on this arrow, you will be met with this:

Step 3: To ensure you generate a study guide that fits your learning style, academic needs, and timeframe, click on the pencil held within the "Study Guide" box.

Step 4: Add specifics into the description box, like shown in the example, and click generate to create an in-depth and structured study guide for any subject.

Last Step: Once it is done generating, it will load under your studio tab, and you can click to open your new study guide!
Creating a Quiz
Step 1: Locate the quiz button on the right side of your screen inside of the "Studio" tab, and click the arrow within the "Quiz" box.
Step 2: After clicking on the arrow, you will be met by the pop-up box below. Similar to creating a study guide, there are several things you can select to customize your quiz, in addition to a text box where you can give Gemini specific commands. You can also see in the top right corner a "Sources" button. If you would like to include only some of the sources in your notebook, you can click on this button to select the specific sources you want in your quiz.

Last Step: As with all generated material, your quiz will load underneath the studio tab after you click "Generate."

Creating a Flashcard Set
Step 1: Again, navigate to your "Studio" tab on the right portion of your screen, and click on the arrow held within "Flashcards."
Step 2: After clicking on the arrow, you are met with a familiar pop-up menu where you can customize your flashcard set. Again, notice the "Sources" button in the top-right of the menu which will allow you to choose which of your sources you would like to be included in the set.

Last Step: As with all generated material, you can open your flashcards by clicking on them under the studio tab once they have been created.

To End...
There are several other things that the Gemini Notebook can generate that I did not cover, but to create them, the steps are all the same. What I have covered here are just the fundamentals that a student needs to not only keep up in class, but excel.
To me, what is most promising about Gemini Notebook is its potential to facilitate educational equity. For many underprivileged students, the idea of receiving help outside of regular school hours is out of reach. But with tools like this, all the information they could ever need is at their fingertips. I hope you found this information to be helpful and that you use free AI-tools to their fullest educational potential in the future. Happy learning!


Comments